Managing inventory levels (inventory quantity) is important for each business because the inventory levels help the Shopify owner know how many inventory quantities are available for the specified inventory items and locations. Based on this information, the Shop owner can adjust the inventory levels to suit the company’s business situation, and it can help the business avoid overstocking. Because of the reasons above, Beehexa will show you how to retrieve inventory levels for the specified inventory items and locations.
Now, let’s explore this subject a little deeper.
If this is the first time you make a call in the Postman, you must generate API credentials from the Shopify admin.
Step 1: Generate API credentials from Shopify Admin
Follow the process of How to build a custom app for Shopify in 2022? To know how to access Shopify API.
-
- After creating an app, remember the Admin API access token and the API key to send requests in the Postman.
After that, we will get location_ids, and inventory_item_ids to retrieve the inventory levels for the specified inventory items and locations.
You can choose multiple inventory items and locations in this request to get the inventory levels.
Example: Today, Beehexa will show you how to retrieve the inventory levels of two inventory items and four locations.
Step 2: Get the location IDs.
We have to get the location_ids because when retrieving the inventory levels in the Postman command, we have to enter the code, including four location_ids.
Now, we will get the location_ids.
-
- Log in to your Postman and create a new workspace
-
- Create a new GET with this URL:
https://{API_key}:{admin_API_access_token}@{shop}.myshopify.com/admin/api/{api-version}/{resource}.json
-
- {API_key} – The API key that you generated.
-
- {admin_API_access_token} – The admin API access token that you generated.
-
- {shop} – The name of your development store.
-
- {api-version} – The supported API version that you want to use.
-
- {resource} – A resource endpoint from the REST Admin API.
Or you can copy this example, remember to change {resource} to {locations}:
https://ed86d512a2c95387ffa25f67074a222b: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@hexasync.myshopify.com/admin/api/2022-01/locations.json
-
- Paste the URL above.

Then click Send
Response:
The API will return all location information.
{
    "locations": [
        {
            "id": 34772975679,
            "name": "428 Dien Bien Phu Ward 11 District 10",
            "address1": "428 Dien Bien Phu Ward 11 District 10",
            "address2": "",
            "city": "Ho Chi Minh City",
            "zip": "700000",
            "province": null,
            "country": "VN",
            "phone": "0978711217",
            "created_at": "2019-11-10T00:09:22+09:00",
            "updated_at": "2019-11-10T00:09:22+09:00",
            "country_code": "VN",
            "country_name": "Vietnam",
            "province_code": null,
            "legacy": false,
            "active": true,
            "admin_graphql_api_id": "gid://shopify/Location/34772975679",
            "localized_country_name": "Vietnam",
            "localized_province_name": null
        },
        {
            "id": 60939796543,
            "name": "General Warehouse",
            "address1": "",
            "address2": "",
            "city": "",
            "zip": "2060",
            "province": "New South Wales",
            "country": "AU",
            "phone": "+61",
            "created_at": "2021-11-05T13:56:52+09:00",
            "updated_at": "2021-11-05T13:57:51+09:00",
            "country_code": "AU",
            "country_name": "Australia",
            "province_code": "NSW",
            "legacy": false,
            "active": true,
            "admin_graphql_api_id": "gid://shopify/Location/60939796543",
            "localized_country_name": "Australia",
            "localized_province_name": "New South Wales"
        },
        {
            "id": 60896116799,
            "name": "Q1",
            "address1": "02 Hai Trieu Ben Nghe Ward, District 1 Ho Chi Minh City",
            "address2": "Bitexco",
            "city": "",
            "zip": "700000",
            "province": "",
            "country": "VN",
            "phone": "",
            "created_at": "2021-03-17T11:57:12+09:00",
            "updated_at": "2021-03-17T11:57:52+09:00",
            "country_code": "VN",
            "country_name": "Vietnam",
            "province_code": null,
            "legacy": false,
            "active": true,
            "admin_graphql_api_id": "gid://shopify/Location/60896116799",
            "localized_country_name": "Vietnam",
            "localized_province_name": null
        },
        {
            "id": 60896149567,
            "name": "Q2",
            "address1": "71 Bùi Tá Hán Phuong An Phu Quan 2",
            "address2": "Desworking",
            "city": "Ho Chi Minh City",
            "zip": "7000000",
            "province": null,
            "country": "VN",
            "phone": "",
            "created_at": "2021-03-17T11:59:04+09:00",
            "updated_at": "2021-03-17T11:59:32+09:00",
            "country_code": "VN",
            "country_name": "Vietnam",
            "province_code": null,
            "legacy": false,
            "active": true,
            "admin_graphql_api_id": "gid://shopify/Location/60896149567",
            "localized_country_name": "Vietnam",
            "localized_province_name": null
        }
    ]
}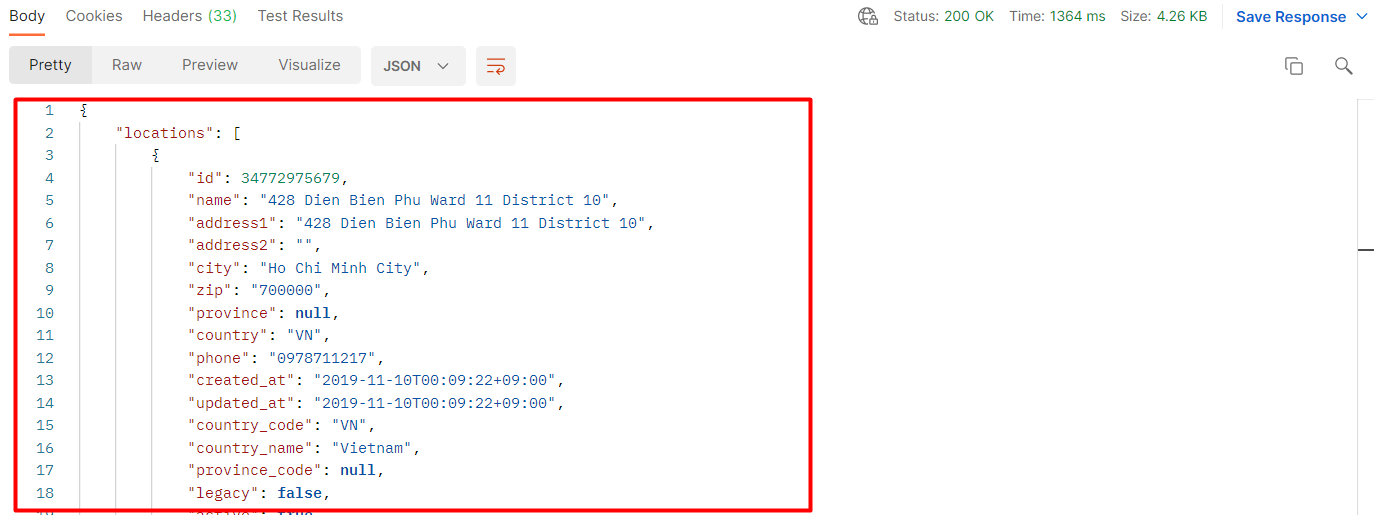
Now, we have four location_ids
“428 Dien Bien Phu Ward 11 District 10” inventory = 34772975679
General warehouse inventory = 60939796543
Q1 inventory = 60896116799
Q2 inventory = 60896149567
Step 3: Get the inventory item IDs
Because the call to get the inventory item ID includes the product variant_id, so we need to collect the product variant id first with these steps:
– In the admin, choose products, click all products
– Choose the product that you want to get variant id
– Scroll down to the variant area, click on the variant you want to collect the variant id
– Finally, copy the id of the product variant in the URL.
The product of these product variants is Beehexa T-Shirt 2021 New Version 01
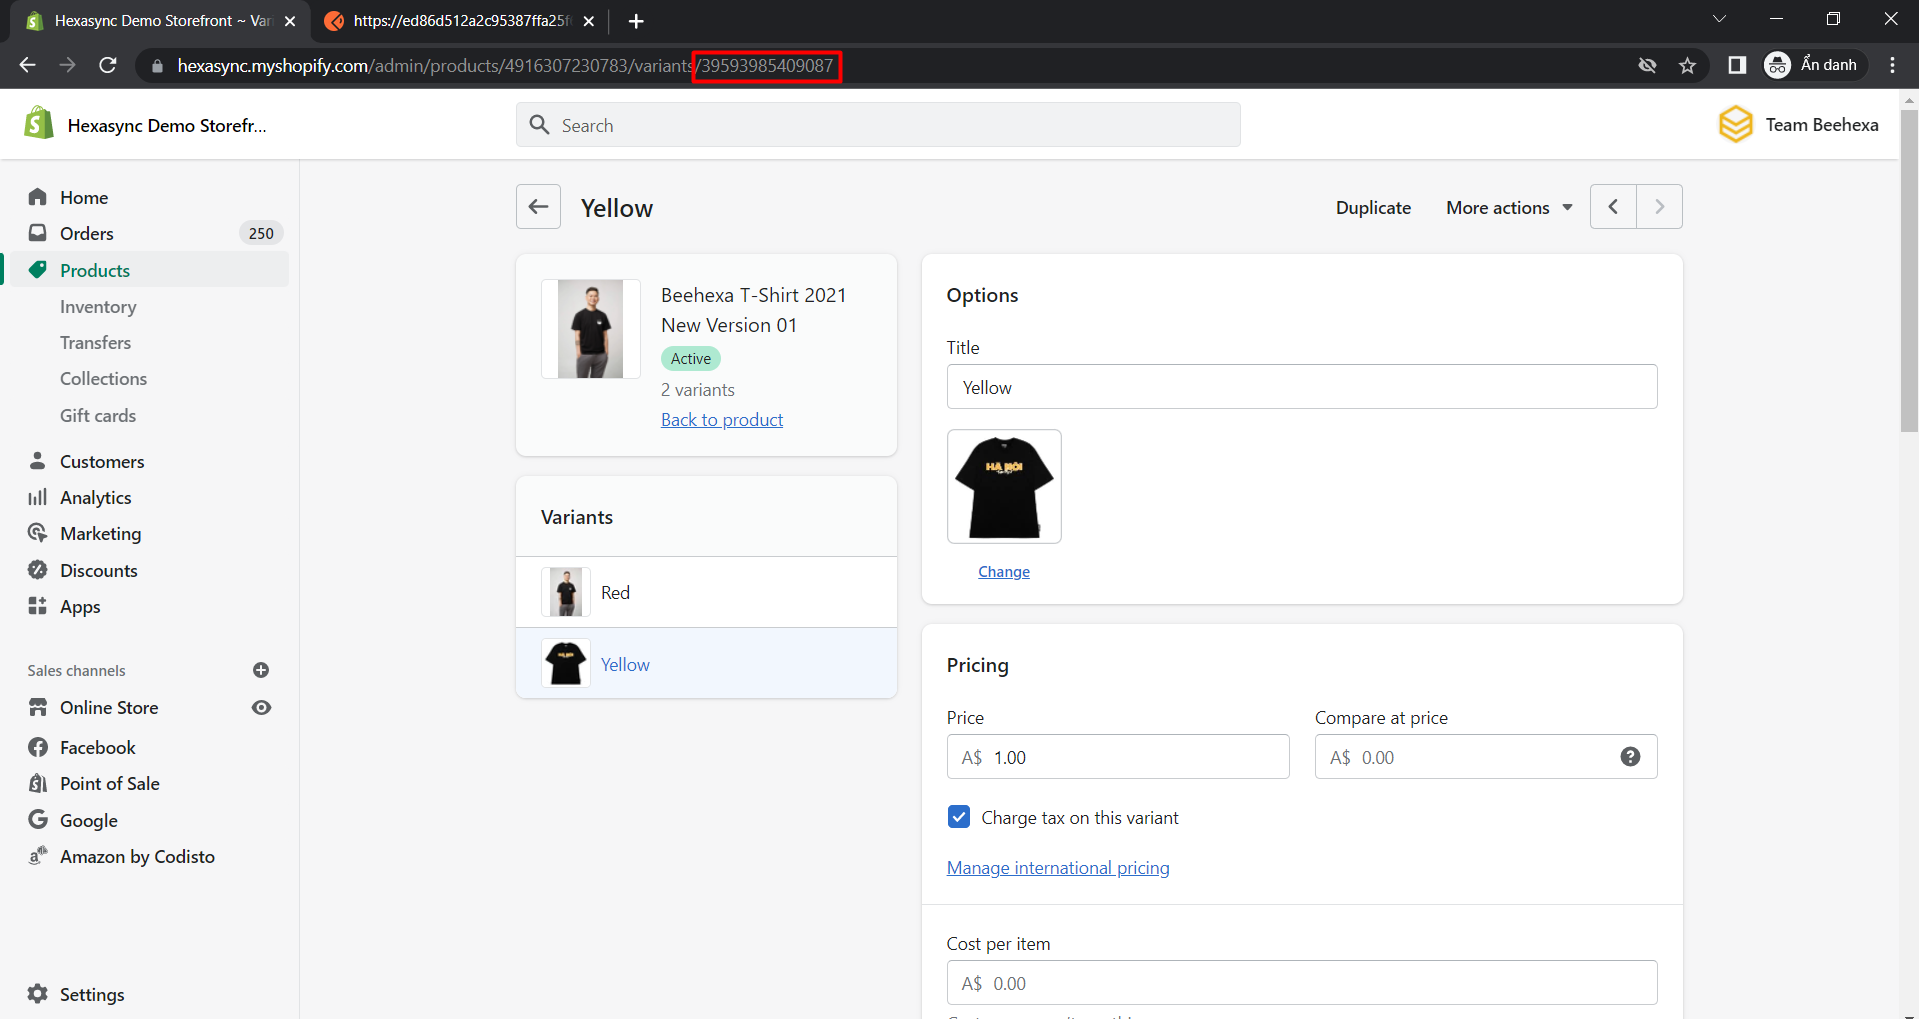
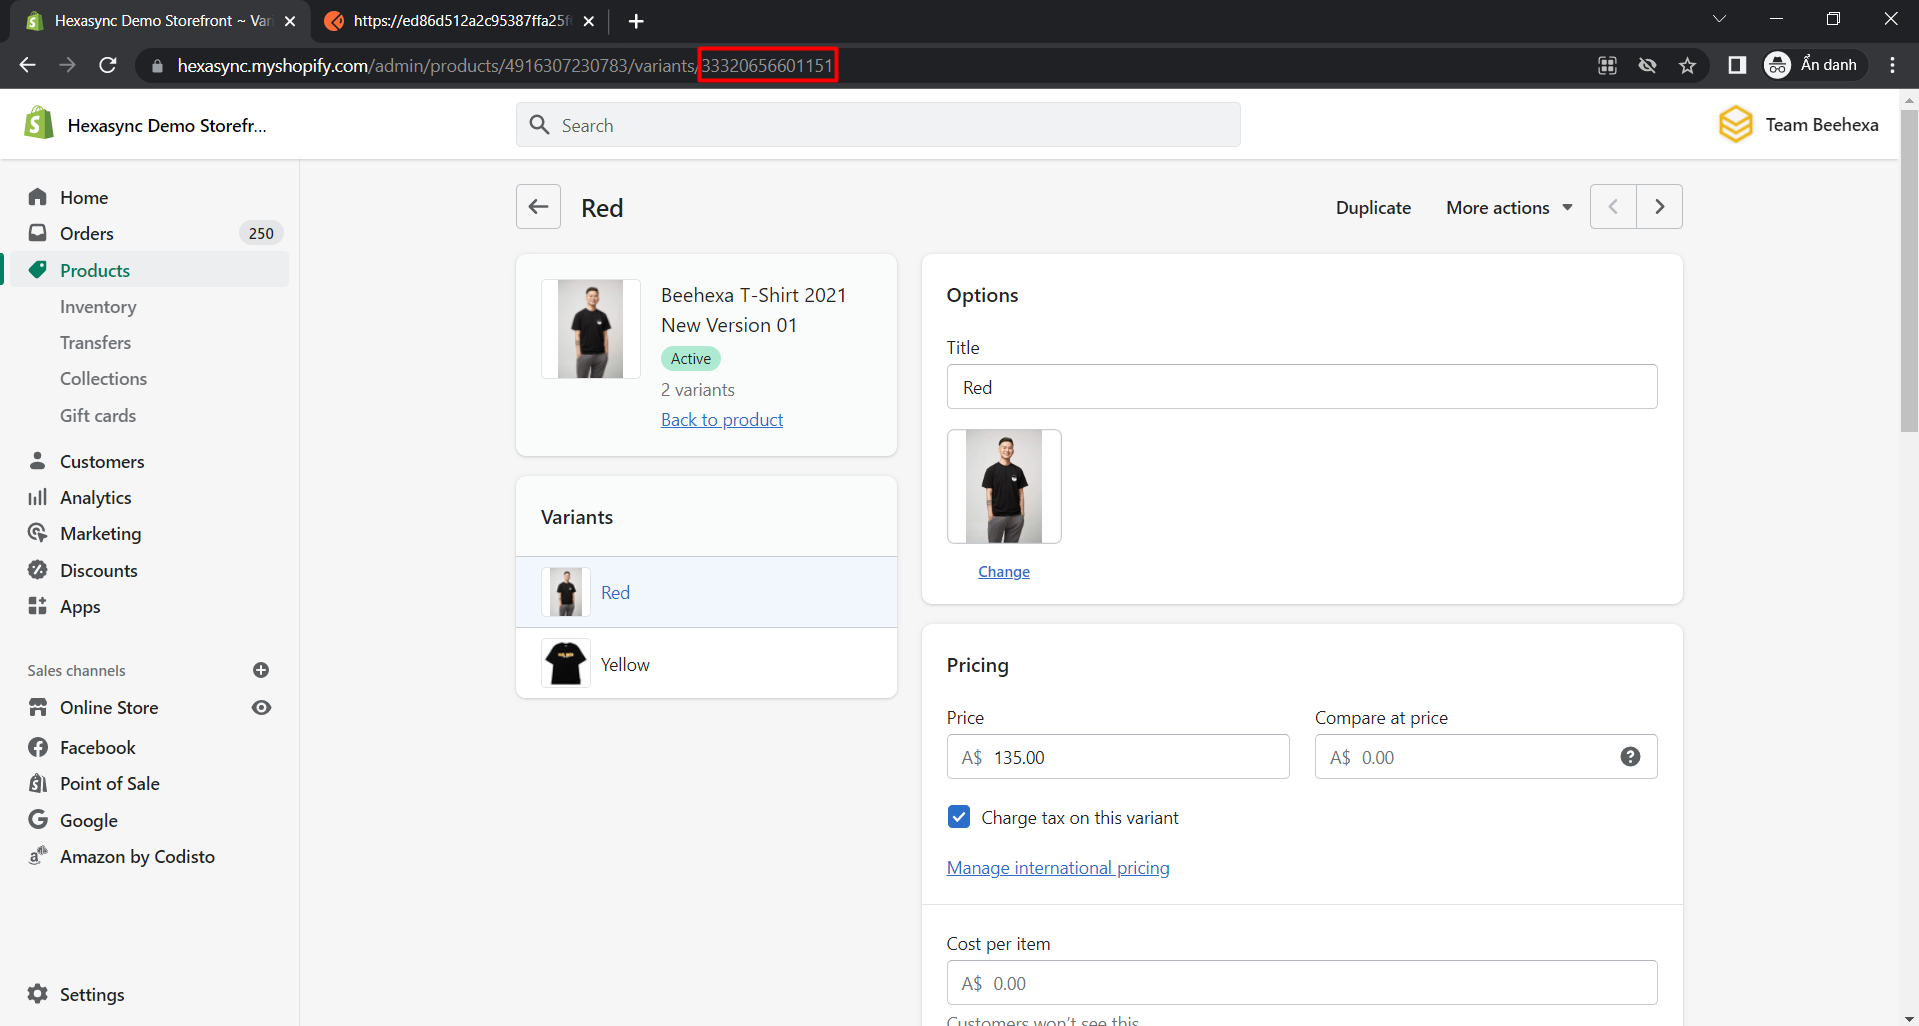
Product Variant _id of the yellow variant = 39593985409087
Product Variant _id of the red variant = 33320656601151
Now we will get the inventory item IDs using Postman:
-
- Log in to your Postman and create a new workspace
-
- Create a new GET with this URL:
https://{API_key}:{admin_API_access_token}@{shop}.myshopify.com/admin/api/{api-version}/{resource}.json
-
- {API_key} – The API key that you generated.
-
- {admin_API_access_token} – The admin API access token that you generated.
-
- {shop} – The name of your development store.
-
- {api-version} – The supported API version that you want to use.
-
- {resource} – A resource endpoint from the REST Admin API.
With two inventory items, you need to request twice.
You can copy this example, remember to change {resource} to {variants/variants_id}:
The yellow variant call
https://ed86d512a2c95387ffa25f67074a222b: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@hexasync.myshopify.com/admin/api/2022-01/variants/39593985409087.json
The red variant call
https://ed86d512a2c95387ffa25f67074a222b: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@hexasync.myshopify.com/admin/api/2022-01/variants/33320656601151.json
-
- Paste the URL above.

Then click Send
Response:
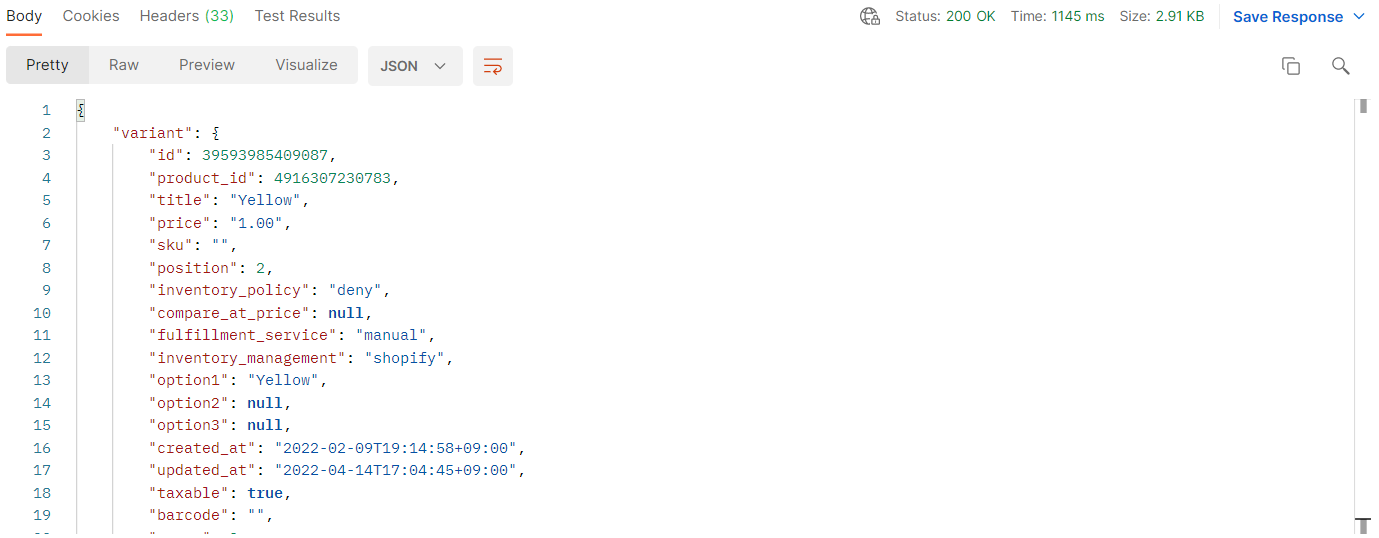
The API will return all information about a product variant.
The yellow variant call
{
    "variant": {
        "id": 39593985409087,
        "product_id": 4916307230783,
        "title": "Yellow",
        "price": "1.00",
        "sku": "",
        "position": 2,
        "inventory_policy": "deny",
        "compare_at_price": null,
        "fulfillment_service": "manual",
        "inventory_management": "shopify",
        "option1": "Yellow",
        "option2": null,
        "option3": null,
        "created_at": "2022-02-09T19:14:58+09:00",
        "updated_at": "2022-04-14T17:04:45+09:00",
        "taxable": true,
        "barcode": "",
        "grams": 0,
        "image_id": 29322366615615,
        "weight": 0.0,
        "weight_unit": "kg",
        "inventory_item_id": 41688806096959,
        "inventory_quantity": 175,
        "old_inventory_quantity": 175,
        "requires_shipping": true,
        "admin_graphql_api_id": "gid://shopify/ProductVariant/39593985409087"
    }
}
The red variant call
{
    "variant": {
        "id": 33320656601151,
        "product_id": 4916307230783,
        "title": "Red",
        "price": "135.00",
        "sku": "1003",
        "position": 1,
        "inventory_policy": "deny",
        "compare_at_price": null,
        "fulfillment_service": "manual",
        "inventory_management": "shopify",
        "option1": "Red",
        "option2": null,
        "option3": null,
        "created_at": "2021-01-15T17:38:09+09:00",
        "updated_at": "2022-04-14T17:05:25+09:00",
        "taxable": true,
        "barcode": "",
        "grams": 0,
        "image_id": 29322364911679,
        "weight": 0.0,
        "weight_unit": "kg",
        "inventory_item_id": 35484570255423,
        "inventory_quantity": 440,
        "old_inventory_quantity": 440,
        "requires_shipping": true,
        "admin_graphql_api_id": "gid://shopify/ProductVariant/33320656601151"
    }
}
Now, we have the inventory item_id of the yellow variant= 41688806096959 and the inventory item_id of the red variant= 35484570255423
Step 4: Retrieve inventory levels for the specified inventory items and locations
We are now ready to retrieve the inventory levels for two items and four locations.
-
- Log in to your Postman and create a new workspace
-
- Create a new GET with this URL:
https://{API_key}:{admin_API_access_token}@{shop}.myshopify.com/admin/api/{api-version}/{resource}.json
-
- {API_key} – The API key that you generated.
-
- {admin_API_access_token} – The admin API access token that you generated.
-
- {shop} – The name of your development store.
-
- {api-version} – The supported API version that you want to use.
-
- {resource} – A resource endpoint from the REST Admin API.
You can copy this example, remember to change {resource} to {inventory_levels.json?inventory_item_ids=35484570255423,41688806096959&location_ids=34772975679,60939796543,60896116799,60896149567}:
https://ed86d512a2c95387ffa25f67074a222b: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@hexasync.myshopify.com/admin/api/2022-01/inventory_levels.json?inventory_item_ids=35484570255423,41688806096959&location_ids=34772975679,60939796543,60896116799,60896149567
-
- Paste the URL above.
Then click Send
Response:
The API will return the data like this.
{
    "inventory_levels": [
        {
            "inventory_item_id": 35484570255423,
            "location_id": 34772975679,
            "available": 10,
            "updated_at": "2022-02-11T16:31:45+09:00",
            "admin_graphql_api_id": "gid://shopify/InventoryLevel/68743397439?inventory_item_id=35484570255423"
        },
        {
            "inventory_item_id": 41688806096959,
            "location_id": 34772975679,
            "available": 15,
            "updated_at": "2022-02-10T17:01:51+09:00",
            "admin_graphql_api_id": "gid://shopify/InventoryLevel/68743397439?inventory_item_id=41688806096959"
        },
        {
            "inventory_item_id": 35484570255423,
            "location_id": 60896149567,
            "available": 300,
            "updated_at": "2022-04-08T23:07:25+09:00",
            "admin_graphql_api_id": "gid://shopify/InventoryLevel/95205589055?inventory_item_id=35484570255423"
        },
        {
            "inventory_item_id": 41688806096959,
            "location_id": 60939796543,
            "available": 10,
            "updated_at": "2022-04-14T17:04:35+09:00",
            "admin_graphql_api_id": "gid://shopify/InventoryLevel/95251824703?inventory_item_id=41688806096959"
        },
        {
            "inventory_item_id": 41688806096959,
            "location_id": 60896116799,
            "available": 50,
            "updated_at": "2022-04-14T17:04:40+09:00",
            "admin_graphql_api_id": "gid://shopify/InventoryLevel/95205556287?inventory_item_id=41688806096959"
        },
        {
            "inventory_item_id": 41688806096959,
            "location_id": 60896149567,
            "available": 100,
            "updated_at": "2022-04-14T17:04:45+09:00",
            "admin_graphql_api_id": "gid://shopify/InventoryLevel/95205589055?inventory_item_id=41688806096959"
        },
        {
            "inventory_item_id": 35484570255423,
            "location_id": 60939796543,
            "available": 100,
            "updated_at": "2022-04-14T17:05:25+09:00",
            "admin_graphql_api_id": "gid://shopify/InventoryLevel/95251824703?inventory_item_id=35484570255423"
        },
        {
            "inventory_item_id": 35484570255423,
            "location_id": 60896116799,
            "available": 30,
            "updated_at": "2022-04-14T17:05:15+09:00",
            "admin_graphql_api_id": "gid://shopify/InventoryLevel/95205556287?inventory_item_id=35484570255423"
        }
    ]
}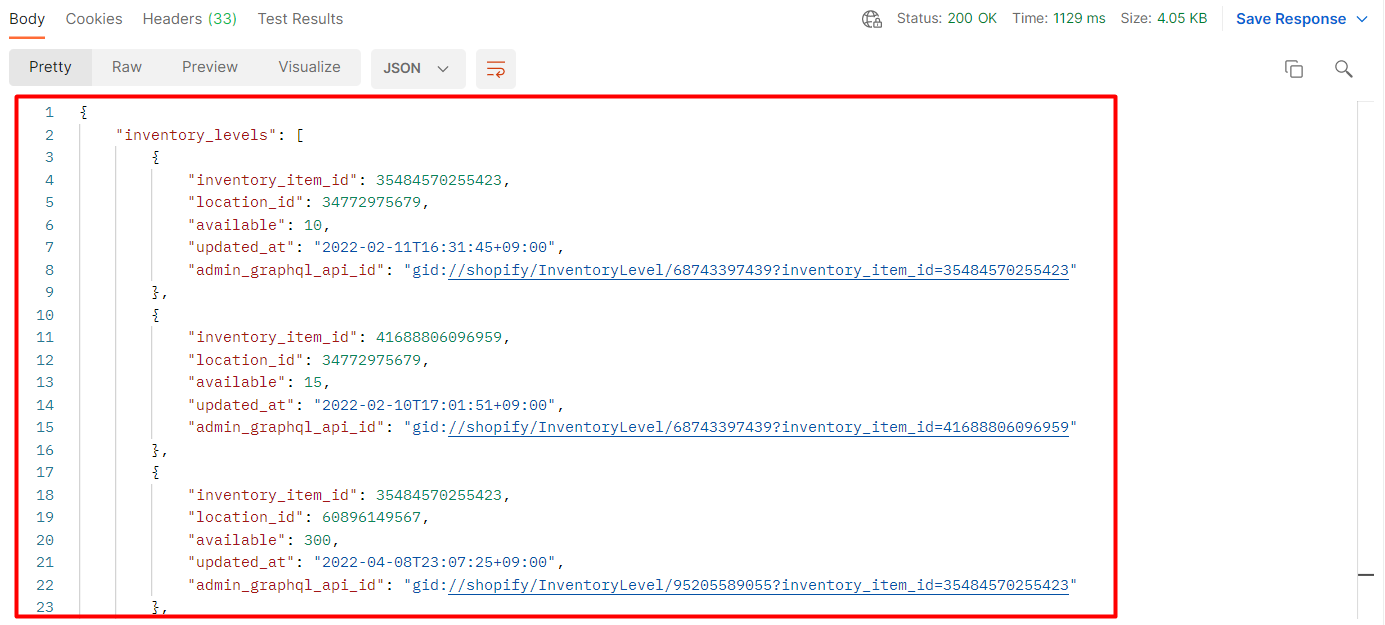
As you can see, the API returns the inventory levels of two inventory items and four locations.
If you want to make these parameters automated or integrate your Shopify store’s metrics with different sales channels, then check out our product by visiting beehexa.com
The above are all steps to Retrieve inventory levels for the specified inventory items and locations using Postman with Shopify API. If you have any questions, let us know in the comment below or refer to our Shopify API documentation.
These steps will be shown visually in the video below.
Hopefully, you can do it!


