Table of Contents
Overview
In the previous blog, we discovered Simple products and Configurable products. To continue the Magento product types tutorial series, in this post, we will help you to discover two Magento product types which are Grouped product and Virtual product.
Type 3: Grouped Product
A grouped product presents multiple, standalone products as a group. You can offer variations of a single product, or group them for a promotion. The products can be purchased separately or as a group.
How to create Grouped Products in Magento 2?
Step 1: Choose the product type
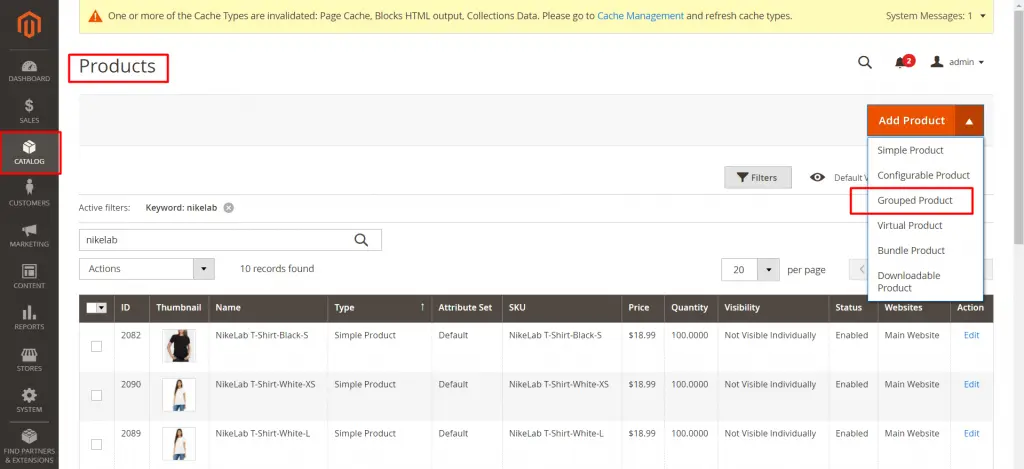
- On the Admin sidebar, go to Catalog > Products.
- On the Add Product menu at the upper-right corner, choose Grouped Product.
Step 2: Choose the attribute set
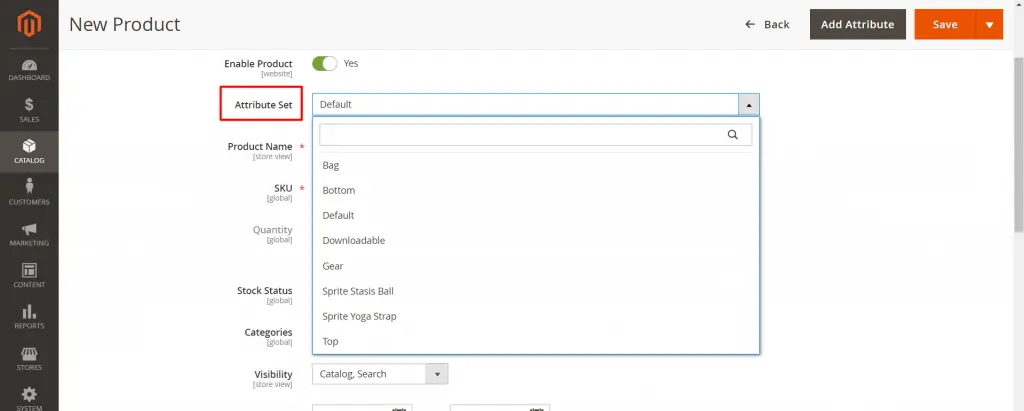
To choose the attribute set that is used as a template for the product, do one of the following:
- To search, enter the name of the Attribute Set.
- In the list, choose the Attribute Set that you want to use.
The form is updated to reflect the change
Step 3: Complete the required settings
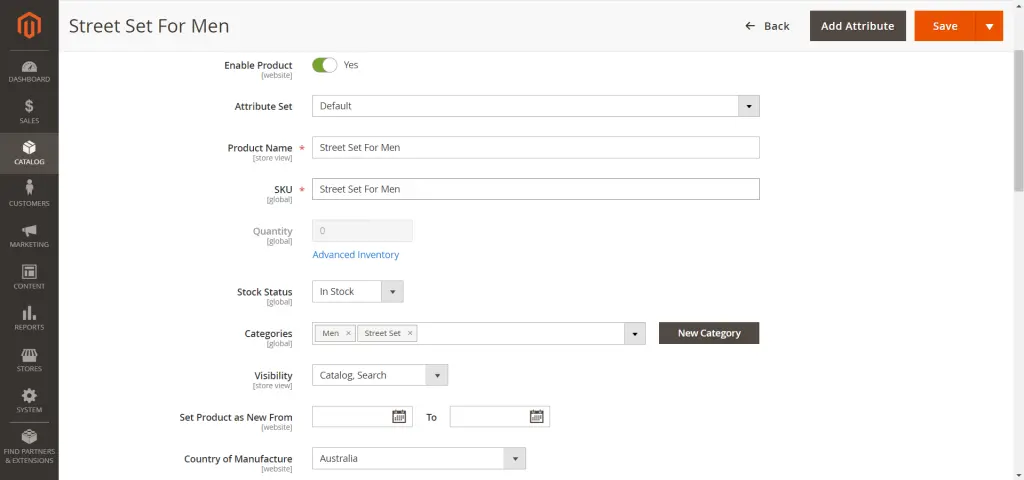
- Enter the Product Name.
- Accept the default SKU that is based on the product name or enter another.
Take note that the Quantity field is not available because the value is derived from the individual products that make up the group.
Step 4: Complete the basic settings
- Accept the Stock Status setting of In Stock.
- To assign Categories to the product, click the Select… box and do either of the following:
- Choose an existing category:
- Start typing in the box to find a match.
- Select the checkbox of the category that is to be assigned.
- Create a new category:
- Click New Category.
- Enter the Category Name and choose the Parent Category to determine its position in the menu structure.
- Click Create Category.
3. Accept the Visibility settings of Catalog, Search.
4. To feature the product in the list of new products, choose the Set Product as New From and To dates on the calendar.
5. Choose the Country of Manufacture.
Step 5: Add products to the group
- Scroll down to the Grouped Products section and click Add Products to Group.
- If necessary, use the filters to find the products that you want to include in the group.
- In the list, select the checkbox of each item that you want to include in the group.
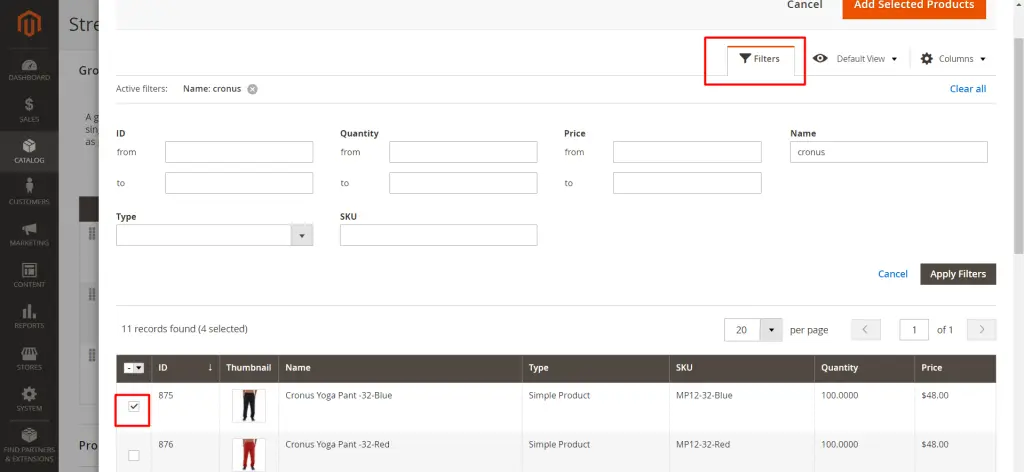
4. Click Add Selected Products to add them to the group.
The selected products appear in the Grouped Products section.
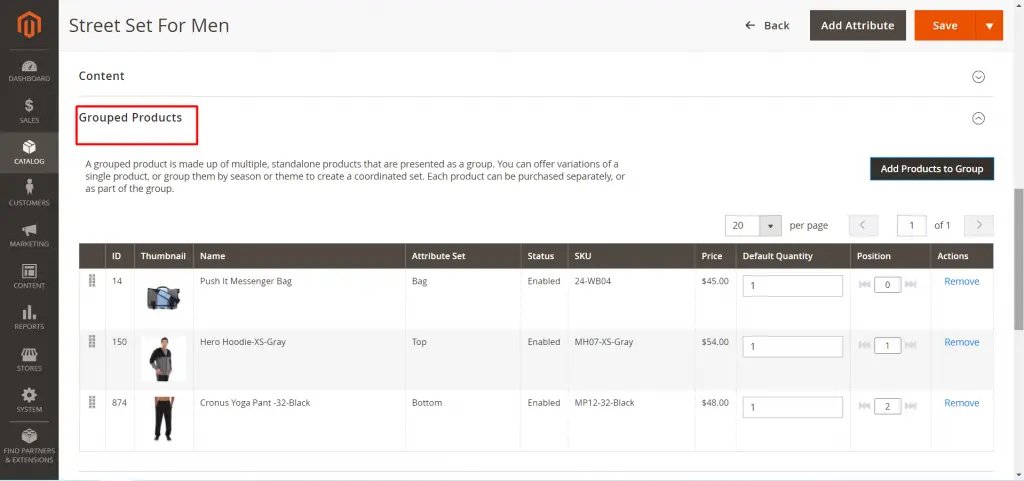
5. Enter a Default Quantity for any of the items.
6. To change the order of the products, grab the Change Order icon in the first column and drag the product to the new position in the list.
7. To remove a product from the group, click Remove.
Step 6: Complete the product information
Complete the information in the following sections as needed:
- Content
- Images and Videos
- Search Engine Optimization
- Related Products, Up-Sells, and Cross-Sells
- Customizable Options
- Products in Websites
- Design
- Gift Options
Step 7: Publish the product
If you are ready to publish the product in the catalog, set Enable Product to Yes.
Step 8: Verify the result
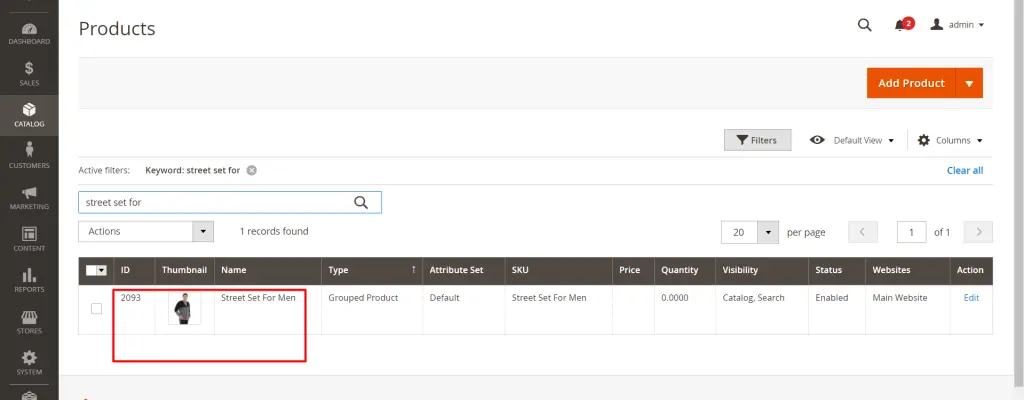
In the Admin sidebar, go to Catalog > Products. Search for: Street Set For Men.
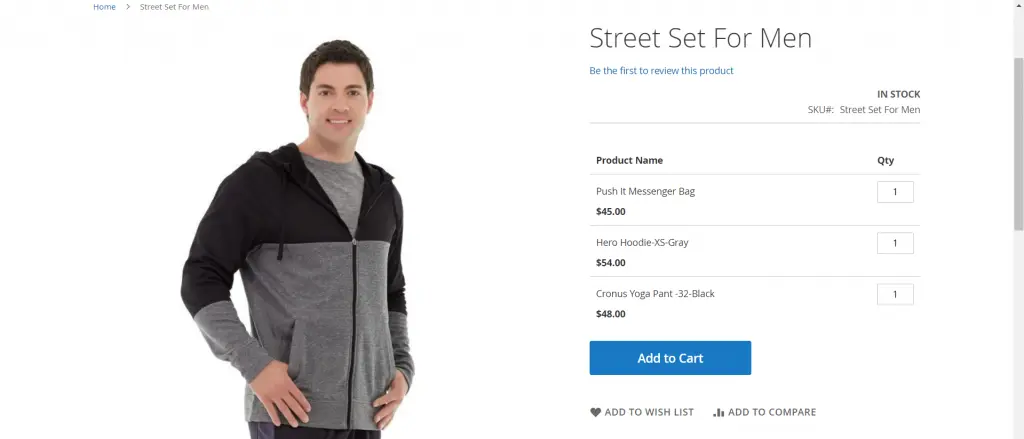
In the Storefront Product Page, search for Street Set For Men.
For a more overview, you can refer to the video tutorial below to custom your settings in Magento 2:

Type 4: Virtual Product
Virtual products, or digital goods, represent non-tangible items such as memberships, services, warranties, or subscriptions and digital downloads of books, music, videos, or other products. Virtual products can be sold individually or included as part of the Grouped Product or Bundle Product product types.
How to create Virtual Products in Magento 2?
Step 1: Choose the product type
- On the Admin sidebar, go to Catalog > Products.
- On the Add Product menu at the upper-right corner, choose Virtual Product.
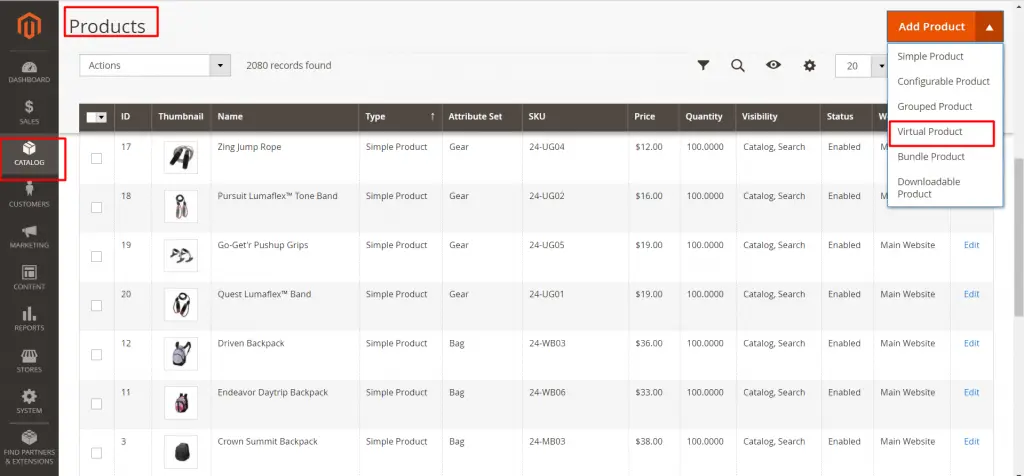
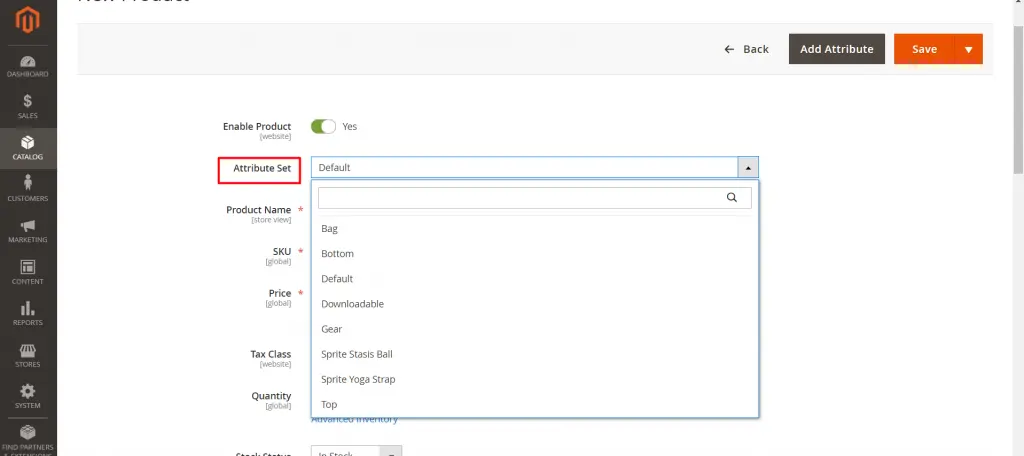
Step 2: Choose the attribute set
To choose the attribute set that is used as a template for the product, do one of the following:
- For Search, enter the name of the attribute set.
- In the list, choose the attribute set that you want to use.
The form is updated to reflect the change.
Step 3: Complete the required settings
- Enter the Product Name.
- Accept the default SKU that is based on the product name or enter another.
- Enter the product Price.

Step 4: Complete the basic settings
- Set Tax Class to one of the following:
- None
- Taxable Goods
- Enter the Quantity of the product that is currently in stock and do the following:
- Accept the default Stock Status setting of In Stock.
Because a virtual product is not shipped, the Weight field is not used.
-
- Accept the default Visibility setting of Catalog, Search.
3. To assign Categories to the product, click the Select… box and do either of the following:
- Choose an existing category:
- Start typing in the box to find a match.
- Select the checkbox of the category that is to be assigned.
- Create a new category:
- Click New Category.
- Enter the Category Name and choose the Parent Category to determine its position in the menu structure.
- Click Create Category.
Step 5: Complete the product information
Complete the information in the following sections as needed:
- Content
- Images and Videos
- Search Engine Optimization
- Related Products, Up-Sells, and Cross-Sells
- Customizable Options
- Products in Websites
- Design
- Gift Options
Step 6: Publish the product
If you are ready to publish the product in the catalog, set Enable Product to Yes.
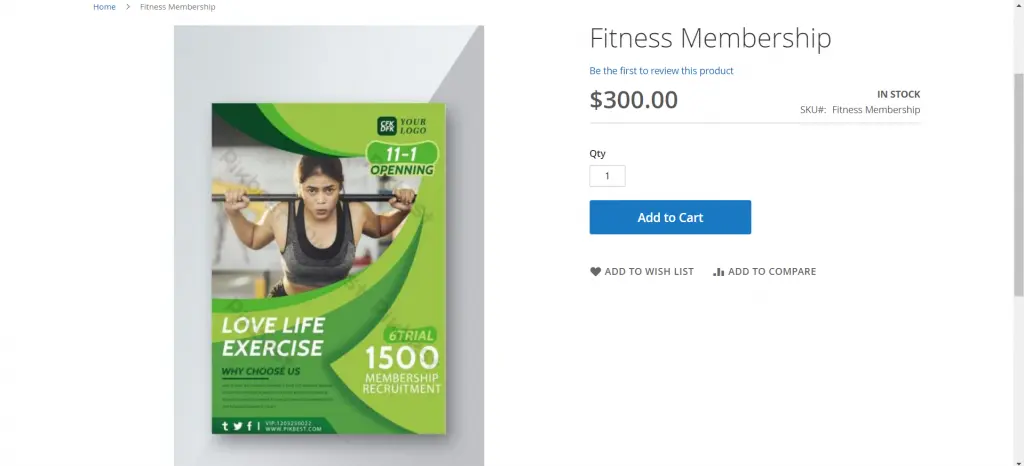
Step 7: Verify the result
In the Admin sidebar, go to Catalog > Products. Search for: Fitness Membership.

In Storefront Product Page, search for: Fitness Membership.
For a more overview, you can refer to the video tutorial below to custom your settings in Magento 2:

Summary
- A grouped product is essentially a collection of simple associated products.
- Virtual products are used for non-tangible products such as services, subscriptions, and warranties. Virtual products are much like simple products, but without weight.
Above is the tutorial of two product types in Magento 2: Grouped Product and Virtual Product. With this MAGENTO 2 guide, we hope you should be able to create and manage Magento-related products.
In the next blog, we will discover two other product types of Magento 2 which are Bundle products and Downloadable products. . For more details, you can refer to Magento 2 User Guide.


